DIY Home Gun Cleaning: Safe Methods That Work

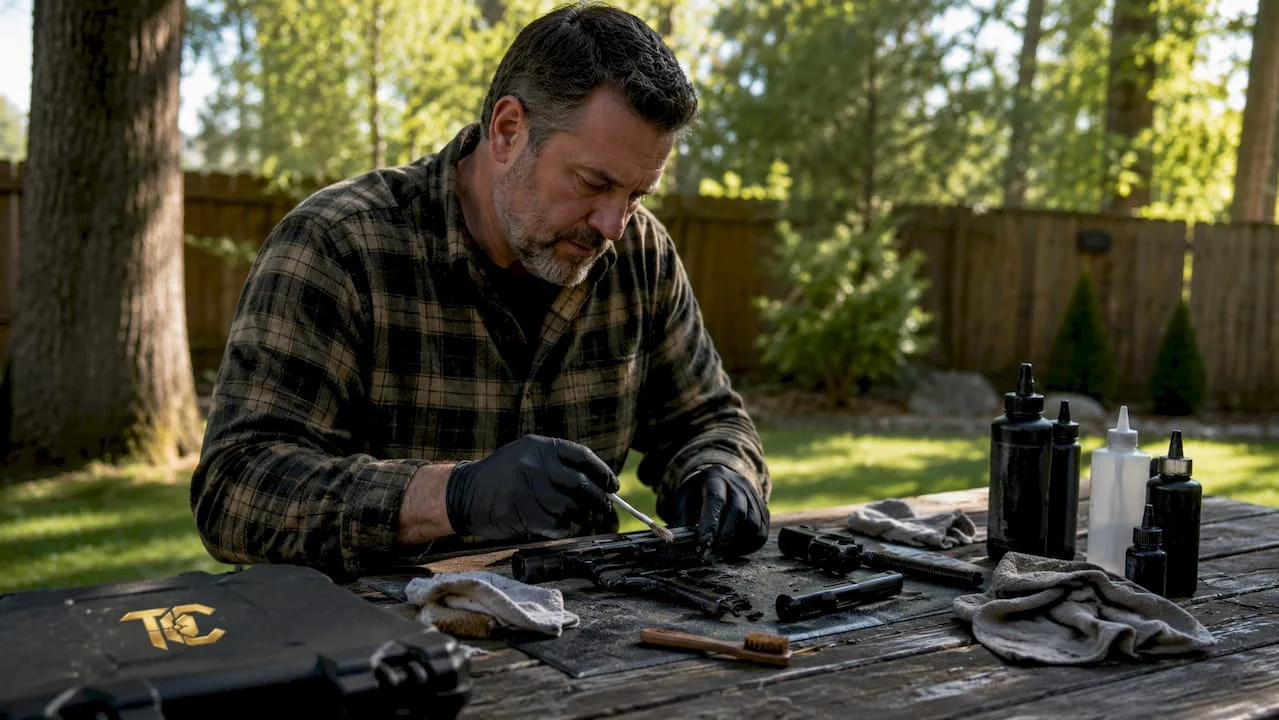
DIY home gun cleaning is the practice of safely maintaining your firearm at home using proper tools, solvents, and technique to preserve reliability and prevent mechanical failure. A clean firearm is not a luxury. It is a functional requirement for any responsible owner. A basic cleaning session takes 10–15 minutes, and a thorough deep clean runs 30–45 minutes. That time investment protects a firearm worth hundreds or thousands of dollars. The industry term for this practice is field maintenance, covering everything from bore cleaning to lubrication and function checks. Whether you carry daily or shoot recreationally, a consistent home maintenance routine is the single most reliable way to keep your firearm performing as built.
What does DIY home gun cleaning actually require?
The core requirement is a caliber-matched cleaning kit, a safe workspace, and the discipline to verify your firearm is unloaded before touching it. Essential supplies include bore brushes, cotton patches, cleaning jags, a cleaning rod, Hoppe’s No. 9 solvent, and a quality gun oil such as CLP (Cleaner, Lubricant, Protectant). These items cover the full cleaning cycle for most pistols and rifles. You can assemble a functional homemade gun cleaning kit for $30–$50, which is comparable in cost to most entry-level store-bought kits but gives you more control over component quality.
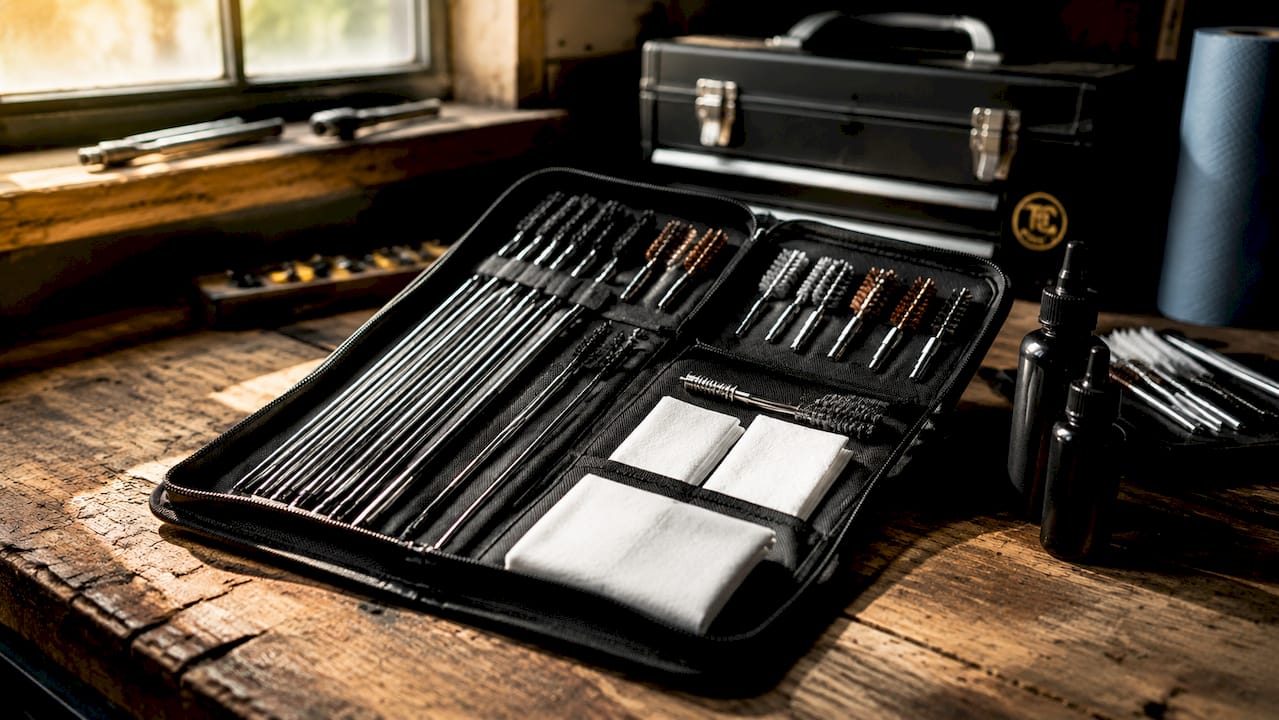
How to build a homemade gun cleaning kit
Store-bought universal kits are convenient, but they trade specificity for convenience. A caliber-specific setup outperforms a generic kit on every metric that matters: bore fit, brush stiffness, and rod rigidity. Experienced owners prefer carbon fiber rods over aluminum or steel because they flex without scoring the rifling. That detail alone separates a kit that maintains your barrel from one that slowly damages it.
Here is what your homemade gun cleaning kit should include:
- Cleaning rod: Carbon fiber, caliber-appropriate length. Avoid stainless steel rods, which can score barrel rifling.
- Bore brush: Bronze for heavy carbon fouling; nylon for polymer-safe cleaning. Match to your caliber exactly.
- Cleaning jag and patches: Cotton patches sized to your bore. A snug fit picks up fouling; a loose patch misses it.
- Bore snake: Optional but fast. A Hoppe’s BoreSnake works well for quick field cleans between full sessions.
- Solvent: Hoppe’s No. 9 is the standard for carbon and copper fouling. Ballistol works well on wood and metal.
- Gun oil or CLP: Break-Free CLP covers cleaning, lubrication, and protection in one product. Slip 2000 EWL is a strong alternative for high-heat applications.
- Cleaning mat: Protects your work surface and keeps small parts from rolling away.
- Microfiber cloths and cotton swabs: For wiping down slides, rails, and tight corners.
| Tool | Purpose | Affordable source |
|---|---|---|
| Carbon fiber cleaning rod | Pushes patches and brushes through bore | Tipton, Amazon |
| Caliber-matched bore brush | Scrubs carbon and copper fouling | Hoppe’s, Brownells |
| Cotton patches and jag | Wipes bore clean after brushing | Hoppe’s, MidwayUSA |
| Hoppe’s No. 9 solvent | Dissolves carbon, lead, and copper deposits | Walmart, Cabela’s |
| Break-Free CLP | Cleans, lubricates, and protects metal surfaces | Bass Pro, Amazon |
| Bore snake | Fast single-pass bore cleaning | Hoppe’s BoreSnake |
Pro Tip: Buy bore brushes and patches by caliber, not by kit. A .45 ACP brush in a 9mm bore does nothing useful. Precision fit is what makes the difference.
Step-by-step guide to cleaning your firearm at home
The cardinal safety rule is non-negotiable: remove the magazine, lock the action open, and physically inspect the chamber before you do anything else. Do this every single time, without exception. A negligent discharge during cleaning is entirely preventable. Once you have confirmed the firearm is unloaded, you can proceed with confidence.
Field stripping
- Consult your owner’s manual. Every firearm strips differently. A Glock 19 strips in four steps; a 1911 takes more. Know your specific model.
- Remove the slide or bolt. For most semi-automatic pistols, lock the slide back, rotate the takedown lever, and ease the slide forward off the frame.
- Separate the barrel, recoil spring, and frame. Keep parts organized on your cleaning mat. A small tray prevents springs from launching across the room.
- Do not over-disassemble. Owner-level field stripping covers the barrel, slide, frame, and recoil assembly. Trigger group and sear work belong to a professional gunsmith.
Cleaning the bore
Begin with the bore: apply solvent to a bronze bore brush and run it through the barrel several times from chamber to muzzle. Let the solvent sit for two to three minutes to break down carbon and copper deposits. Then switch to a clean patch on your jag and run it through until patches come out clean. Expect the first two or three patches to come out dark gray or black. That is normal. Keep going until the patch is white or near-white.
Safety note: Always push the bore brush from chamber to muzzle, never back and forth. Reversing direction inside the bore can damage the crown and affect accuracy.
Cleaning the action, slide, and rails
Use a cotton swab dipped in solvent to clean the slide rails, feed ramp, and locking block. These areas accumulate carbon quickly and are often overlooked. Wipe down the exterior of the barrel with a solvent-dampened microfiber cloth. For bolt-action rifles, use a bore guide to protect the trigger group and stock from solvent runoff during cleaning. This is a step most beginners skip, and it causes real damage over time.
Lubrication and reassembly
Apply gun oil sparingly. Over-lubrication is one of the most common mistakes in home gun maintenance. A thin film on the slide rails, barrel hood, and locking surfaces is all you need. Excess oil attracts carbon and grit, which accelerates wear rather than preventing it. Reassemble in reverse order, then perform a full function check: rack the slide, dry-fire (if safe to do so on your model), and verify the trigger resets correctly.
Pro Tip: Think of lubrication like seasoning a cast iron pan. A thin, even coat protects everything. A puddle of oil causes problems.
Common mistakes in DIY gun cleaning and how to avoid them
Consistency and correct tools matter more than how often you clean. A monthly cleaning done right beats a weekly cleaning done carelessly. These are the mistakes that cause the most damage:
- Skipping the unloaded check. This is not optional. Every cleaning session starts with a verified empty chamber.
- Using harsh solvents on polymer frames. Aggressive solvents damage polymer over time. Use products rated safe for polymer, such as Hoppe’s Elite or Ballistol.
- Using the wrong caliber brush. An oversized brush damages the bore. An undersized brush does nothing. Match exactly.
- Using stainless steel cleaning rods. Steel rods can score rifling, especially in aluminum-lined barrels. Carbon fiber or coated brass rods are the correct choice.
- Skipping the function check after reassembly. A function check after reassembly is as important as the cleaning itself. It confirms the firearm is safe and operational before it goes back in the holster or safe.
- Ignoring copper fouling. Carbon cleans up quickly. Copper fouling from jacketed bullets requires a dedicated copper solvent like Bore Tech Eliminator or Butch’s Bore Shine. Skipping this step degrades accuracy over time.
How often should you clean and store your firearms?
Cleaning frequency depends on how you use the firearm. Defensive firearms need cleaning after every range session. Range-only firearms can go 500–1,000 rounds between full cleans. Stored firearms need a light oil wipe-down every three to six months to prevent corrosion. That schedule is not arbitrary. Moisture, humidity, and temperature swings attack metal surfaces even when a firearm sits untouched in a safe.
Cleaning intervals by use case
| Use case | Cleaning frequency | Notes |
|---|---|---|
| Defensive carry firearm | After every range session | Reliability is non-negotiable for carry guns |
| Range-only firearm | Every 500–1,000 rounds | Deep clean at 1,000 rounds minimum |
| Stored firearm | Every 3–6 months | Light oil wipe; check for rust or corrosion |
| Exposure to rain or humidity | Immediately after exposure | Moisture causes corrosion fast |
Storage best practices
Proper firearm storage extends the life of your maintenance work. Store firearms in a low-humidity environment, ideally with a dehumidifier rod or silica gel pack inside the safe. Apply a thin coat of oil to all metal surfaces before long-term storage. Avoid storing firearms in leather holsters for extended periods. Leather retains moisture and accelerates rust on blued finishes.
There is also a clear line between owner-level maintenance and professional gunsmithing. Field stripping, bore cleaning, and lubrication are your responsibility. Trigger jobs, sear modifications, and barrel threading require a licensed gunsmith. Crossing that line without the right training creates safety and legal risks. For a broader look at responsible firearm practices, the principles of maintenance connect directly to safe ownership.
Key takeaways
Consistent, correct home gun maintenance using caliber-matched tools and proper solvents protects firearm reliability, prevents corrosion, and extends the life of your investment.
| Point | Details |
|---|---|
| Safety first, always | Verify the firearm is unloaded before every cleaning session, without exception. |
| Build a caliber-specific kit | Use carbon fiber rods, matched bore brushes, Hoppe’s No. 9, and CLP for best results. |
| Follow a cleaning schedule | Clean defensive guns after every session; stored guns need a wipe-down every 3–6 months. |
| Avoid common tool errors | Never use stainless steel rods or wrong-caliber brushes; both cause measurable bore damage. |
| Always run a function check | Reassembly is not complete until you verify the trigger, slide, and safety all operate correctly. |
What I have learned from years of cleaning firearms at home
I built my first homemade cleaning kit out of necessity. A store-bought universal kit left me with brushes that did not fit and a rod that flexed so badly it was useless. That experience pushed me toward caliber-specific setups, and I have never gone back.
The single biggest shift in my cleaning routine was treating the function check as part of the cleaning process, not an afterthought. I have caught a reassembly error exactly once. That one catch was worth every function check I have ever done.
The other thing I tell every new owner is this: do not over-lubricate. More oil does not mean more protection. A firearm running too wet attracts fouling faster than a dry one. Think of it the way you would think about a well-selected cigar. The right amount of preparation makes the experience work. Too much ruins it.
I also want to be direct about the owner-versus-gunsmith boundary. I have seen people attempt trigger work at home after watching a video. That is a different category of work entirely. Field maintenance is something every owner should master. Internal modifications are something you hand to a professional. Knowing that line is part of being a competent owner.
For anyone starting out, the step-by-step cleaning guide at Tungstencreektactical covers each phase in detail and is worth bookmarking.
— Brian
Gear built for owners who take maintenance seriously
Tungstencreektactical serves firearm owners who understand that a well-maintained gun is a reliable gun. Whether you are running a precision build or a carry pistol, the right tools and accessories make every cleaning session faster and more effective.

Tungstencreektactical’s custom firearms and precision builds are designed for owners who hold their equipment to a high standard. From the barrel to the finish, every component is selected for durability and performance. If you are ready to invest in a firearm that rewards proper care, explore what Tungstencreektactical builds for serious owners. You can also get expert cleaning tips from certified instructors to sharpen your home maintenance routine.
FAQ
What is the safest first step before cleaning any firearm?
Remove the magazine, lock the action open, and visually inspect the chamber before touching anything else. This step is mandatory every single time, regardless of how confident you are the firearm is unloaded.
Can I use household solvents to clean my gun?
No. Household solvents like WD-40 or acetone are not formulated for firearms and can damage polymer frames, degrade finishes, and leave residues that attract fouling. Use purpose-built products like Hoppe’s No. 9 or Ballistol.
How long does a basic home gun cleaning take?
A basic field clean takes 10–15 minutes. A thorough deep clean, including bore scrubbing and detailed action work, takes 30–45 minutes. Neither requires specialized skills, only the right tools and a consistent process.
What is the difference between field stripping and full disassembly?
Field stripping separates the major components (barrel, slide, frame, recoil spring) for routine cleaning. Full disassembly goes deeper into the trigger group and internal components. Full disassembly is typically reserved for professional gunsmiths.
How do I prevent rust on a stored firearm?
Apply a thin coat of quality gun oil like CLP or Rem Oil to all metal surfaces before storage. Store the firearm in a low-humidity environment with a dehumidifier rod or silica gel pack, and perform a light wipe-down every three to six months.
Recommended
Related Post

Discover the 5 ways
An introduction to Tactical Luxury Guns & Coffee We founded
Top 5 Best PCC’s
In 2026, the Pistol Caliber Carbine (PCC) market is no